Building and maintaining a proper drainage system is crucial for your future lawn maintenance. Doing so assures your home stays dry and free of mold. If you live in an area that collects a lot of rain, your yard more than likely has a standing water issue. Not having a drainage system installed on your property plays the risk of unsubtle pooling in your yard and water in and around your home. This leads to molding, foundation cracks, major leaking, and many more tasks you’re not going to want to deal with. The most common way commercial properties and homeowners collect runoff water and channel it is by building a French drain system.
Consult With A Local Landscaping Company
Consider scheduling a lawn analysis to get our Little Rock landscaping expert’s opinion before installing a French drain system on your own. The BBB always recommends obtaining 3 estimates before moving forward with any type of home improvement project. If you are in need of an additional information, check out our French Drain services in Little Rock.
What Is A French Drain System?
Before you install a drain on your property, you must first know how a French drain works (also known as French ditch drain). The earliest French drain design dates back to the early 1800’s; people dug basic ditches from a high area to a lower one and filled them with gravel. Despite the fact most think this was discovered in France, a man of the name Henry Flagg French popularized them in his book, “Farm Drainage (1859).” But of course, much has changed since then. With a number of supplies and variations, there now numerous ways to build a French drain.
Materials Needed
The following materials are needed when installing a French drain system for your home:
Trencher
A trencher is not 100% necessary, but it is a heck of a lot easier than digging with a shovel. If you have are looking to save some money on your French drain, then recruiting a team of your closest friends or family is absolutely necessary to get the job done quickly.
Striping spray paint
If you are not exactly sure where your lines are buried on your property, then you must stripe where you plan to dig your French drain. Doing so ensures that the proper utility locator can verify whether or not you have picked the best spot to dig.
Top soil
Some people just re-use the loose dirt from initially digging the French ditch. Depending on whether or not you plan on building a whole new landscape design with your french drain, you may want to buy more top soil.
Gravel
Gravel is used within the complete French drain system to help water flow more freely as it passes through the drain pipe. Gravel surrounds the entire drain pipe while also being wrapped in the landscape fabric.
Landscape fabric (filter fabric)
Landscape fabric is used as a protective layer between the French drain design and the earth. Its purpose is to wrap the entire French drain and protects it from soil washing into it. This helps prolong the life of your new drainage system, and leaving it easier to maintain.
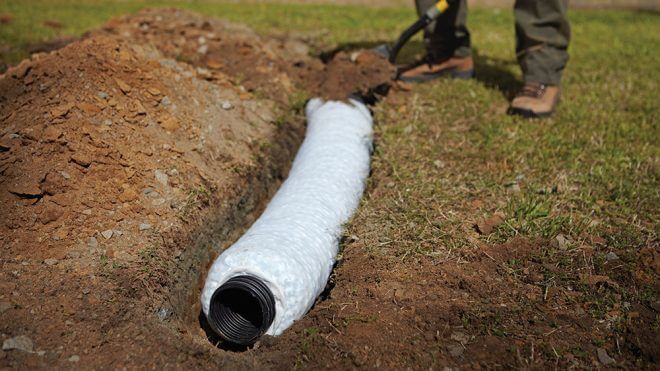
Drain pipe
The drain pipe is the backbone of the entire French drain. This pipe will be perforated and should be facing downwards so the water can escape freely through, through the gravel, and back into the earth.
Landscaping stones (optional)
Some use landscaping stones on the very bottom of the drain, serving as a first layer of rocks, then placing gravel on top. Along with this, you can use decorative landscaping stones to place on top of your French drain after you are done installing.
Determining Your Drain Location
When choosing the best location to drain your excess water, it’s always a good idea to try and tap into any existing bodies of water or drains. Try staying away from any neighboring properties as this can cause damage to your neighbor’s lawn. Once you have determined the best location for your outlet, you may begin striping the zone you plan to dig.
Before You Dig
The most important step before beginning any digging project is by marking where you plan to dig, then Call 811. Each state has an 811 call center ready to help you get started with any digging project. Just a quick call, and you can have the proper utility company out to mark any buried lines so you can safely dig around them.
Excavating Your Trench
Start digging your trench from the point where the most water excess comes together. Ideally your trench should run across a slope of at least 1% (1 inch per 10 feet of grade) this way, gravity will be on your side. The size of your trench all depends on the size drain you are installing. On average, these trenches tend to be at least 18 inches deep and about a foot wide.
Lay Down Landscape Fabric
In order to keep your French drain free of dirt, tree roots or silt, line it with weed barrier or filter fabric. You will want to leave at least 10 inches, depending on the size of your drain pipe, of excess fabric on either side of the trench. This is because in a few more steps, you will be folding the excess fabric over the top of the drain.
Gravel Bedding
Once you have lined the ditch with landscape fabric, you will need to shovel about 2-3 inches of gravel on the bottom of the ditch, on top of the fabric. If you are taking the route of using landscaping stones along with gravel, you will want to place the first layer of landscaping stone, then place the gravel on top of the stones.
Laying Your Drain Pipe
Lay your perforated drain pipe with a majority of the holes facing downwards on top of the gravel bedding you have just created. Facing the holes down will ensure the absolute best drainage.
Covering Your New Drain
Start shoveling another layer of gravel on top of the drain pipe. Your goal is to leave about 3-4 inches from the gravel to the top of the ditch. Once the drain is fully covered in gravel, it is time to fold the excess fabric over on top of the French drain. This will prevent any debris coming falling into the holes while still allowing water to flow through.
Filling Your Trench
Fill the rest of the trench with any loose topsoil/dirt you dug out in the beginning of your project. At this point, your French ditch drain is officially installed and to be finished in any way you like. You can top it off by seeding new grass, laying sod, or laying decorative landscaping stones. Many people will build a French drain with a curve to make the design look more intentional.